

-
How to switch Acunetix UI to Simplified Chinese ?
The latest version of Acunetix allows you to change the Acunetix UI to Simplified Chinese.
Change the UI Language
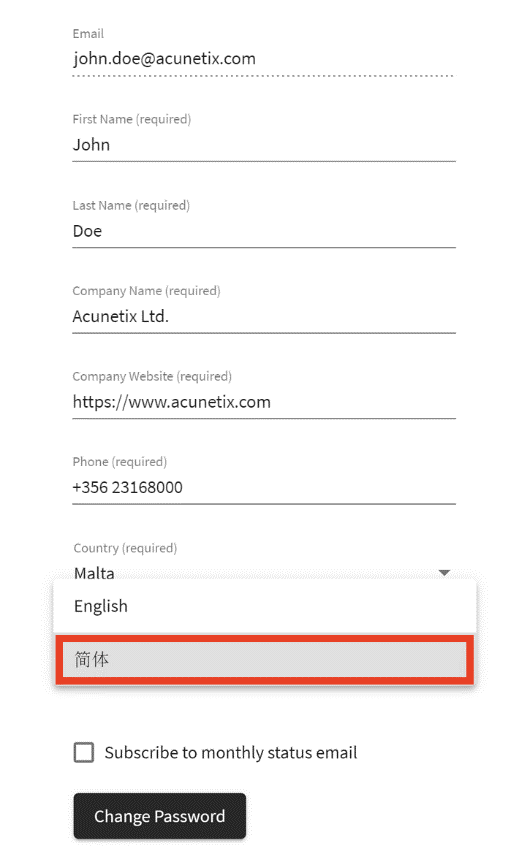
1. Login using the credentials provided during the installation
2. Change to the user profile page; this is the page which is shown on new installations
3. Switch the language to 简体 (Simplified Chinese) -
How do I update to the latest Acunetix build?
Keeping Acunetix up-to-date is important to ensure you always get the latest updates to existing and newly added tests, features, bugfixes and improvements. Fortunately it’s not only easy but transparent.
By default Acunetix automatically checks for updates, installs any new updates in the background without any user interaction.

This behaviour can be configured by navigating to Settings > Product Updates.
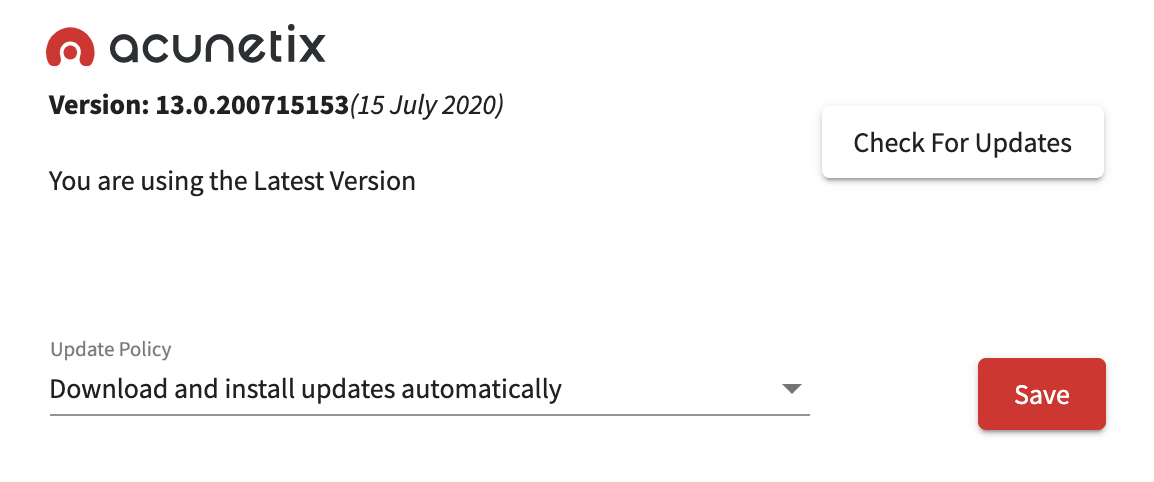
Acunetix can also be set to "Notify me of new product updates" or "Do not automatically check for updates [Not recommended]
Who is eligible for build upgrades?
All Acunetix customers are eligible for a build upgrade within the same version. However you would require a valid Maintenance Agreement for version upgrade. Contact our Sales Team at sales@acunetix.com for more information.
-
What is a Target?
A target is a website, web application, server, or network device that you would like to scan for security vulnerabilities. In general, a target license is required for each web application and for each domain. For licensing purposes, the following rules apply:
localhost and 127.0.0.1 consume 1 target
example.com and www.example.com count as 1 target
https and http count as 1 target
Subdomains are different targets, e.g. www.example.com and www2.example.com consume 2 targets
Different URLs in the same domain count as 1 target, e.g. www.example.com and www.example.com/blog/ consume 1 target
Different ports for the same address count as 1 target, e.g. www.example.com:8080 and www.example.com:8888 consume 1 target
Acunetix test sites (vulnweb.com) do not consume any targets
There is an upper limit to the number of targets you can create, irrespective of how many variations are created following the above rules; this limit is equal to 5 times the number of targets purchased and allowed by your license
For Acunetix 360, the rules may differ. For further information, see Acunetix 360 below. -
How do I avoid getting blocked by my hosting provider when running an Acunetix scan?
When scanning a website or web application using Acunetix, your hosting provider may block your IP address, and as a result, you may not be able to access your own website. After requesting the hosting provider, the site becomes available again. How can you configure or use Acunetix WVS in a way that reduces the possibility of an ISP blocking the IP address of the computer which accesses the site using test tools?
Why does this happen?
ISPs typically block repeated requests coming from a single IP address using an IDS (Intrusion Detection Systems). The ISP’s IDS would typically automatically block an IP address when too many requests are coming from a specific IP address in a short amount of time. This is done to protect the website or web application from a Denial of Service (DoS) attack.
How can I handle this?
Whenever running a scan on third-party infrastructure, it is very important to co-ordinate with the ISP, hosting provider or cloud service on a ‘time-window’ when you can run your Acunetix scan without getting blocked. Alternatively, you can configure Acunetix to reduce the speed at which it makes its requests to reduce the possibility of being caught by some IDS mechanisms, however, keep in mind that because Acunetix would be sending requests at a slower rate, the scan would require more time to complete.
Important Considerations
Finally, be careful when running a scan against a live site as, if misconfigured, a scan could potentially be dangerous to the underlying data. Tests preformed may attempt to inject spurious values into inputs found across the site. You can read more why such might happen from the blog post Negative Impacts of Automated Vulnerability Scanners and How to Prevent them. -
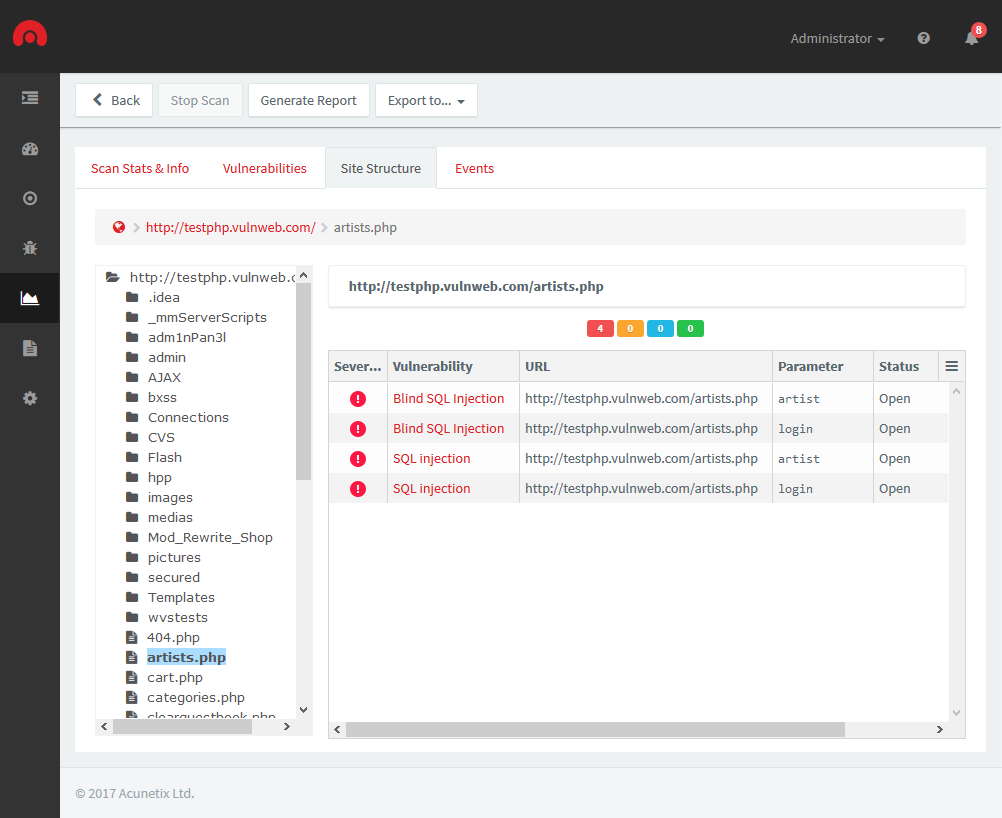
How can I be sure that Acunetix has crawled my entire website?
The scan results of a web scan includes the Site Structure identified and scanned by Acunetix. This can be accessed from the Scan Results page > Site Structure tab. Click on the folder icons to expand the site structure. Acunetix will show the vulnerabilities identified on the file or folder selected.
-
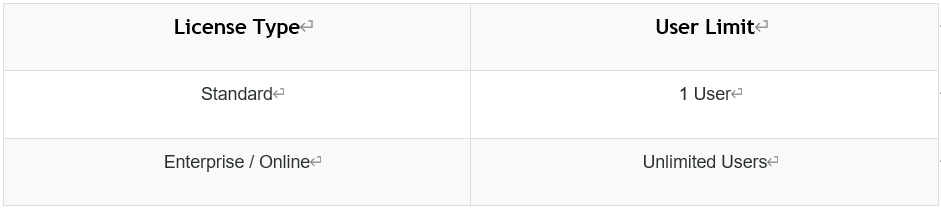
How many users can be created in Acunetix?
Acunetix is a multi-user system. The first account that is created is the main admin account, also referred to as the root account. This main admin account can create additional users, giving a role to each user account and configuring which Scan Targets can be scanned or reported on. More information on creating and managing user accounts can be found here.
The number of users that can be created in Acunetix depends on your license.
-
How long does a scan take to complete?
The duration of a scan depends on many things, including network latency, size of site being scanned, the server’s resources and services running on the scanned server. The average scan time for a network scan is 20 minutes, while the average time for a web scan is between 2 and 4 hours.
-
How To Generate Reports
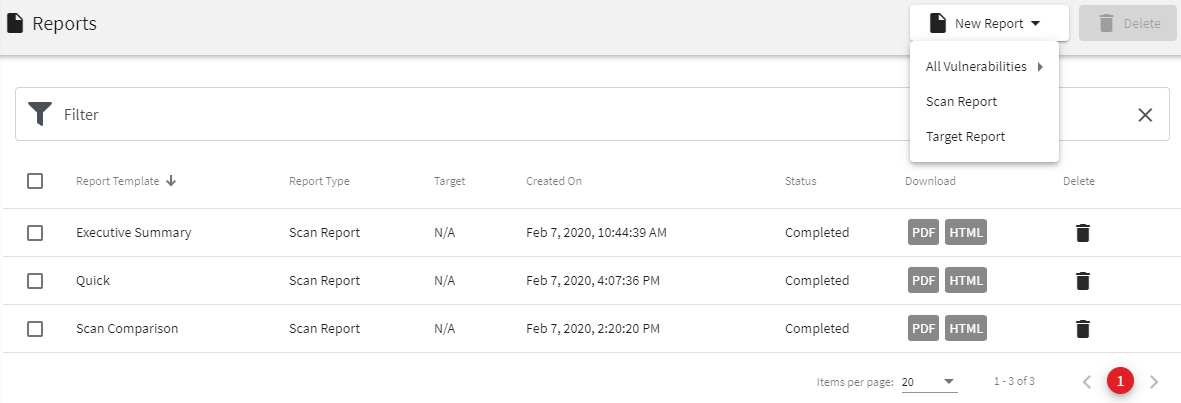
Screenshot - Create a new report
From the Reports page, there are 3 types of reports that can be generated:
• All Vulnerabilities report - report on all the vulnerabilities detected on all the Targets configured in Acunetix
• Scan Report - report on the vulnerabilities detected by one or multiple scans. When 2 scans for the same Target are selected,
you will be given the option to compare the scans by using the "Compare Scans" button
• Target Report - report on all the vulnerabilities detected on one or multiple Targets taking into consideration all the scans done on the target(s).
Reports can also be generated directly from the Targets page, the Vulnerabilities page or the Scans page.
Screenshot - Generate a Report
After choosing what to report on, you will need to choose a report template. The format of the report, the detail included, and the grouping used in the report are determined by the report template. Report templates are described in the next section.
After choosing to generate the report, you will then be taken to the Reports page. The report might take a few seconds to generate. The PDF or HTML report can be downloaded by clicking on the Download link, which becomes available when Acunetix has finished generating the report. -
What is the difference between Fixed, Ignored and False Positive.
When checking vulnerabilities, you have the option of marking a vulnerability as either Fixed, Ignored or False Positive.
Fixed should be used when the vulnerability has been fixed by the developers. If the vulnerability is detected again,
it will be re-opened and marked as Rediscovered.
Ignored should be used for vulnerabilities when you know about a vulnerability but do not want to be informed about it in the future.
This status should be used with caution.
False Positive should be used in the rare occasion that a vulnerability is reported incorrectly by Acunetix.
This status is used after the vulnerability has been verified manually. Kindly report False Positives to our support team. -
How to enable Email Notifications in Acunetix On-Premises
While Acunetix provides us with a realtime dashboard and scan results, sometimes, you may simply want to be notified when an event that requires your attention occurs, for example, when a scan completes. In Acunetix on-premises, you’ll need to configure an SMTP server that will be used to deliver these notifications.
Note – In Acunetix Online, you will receive email notifications automatically.
To enable notifications in Acunetix on-premises, navigate to Settings > Notification Settings, and enable Notification Settings.
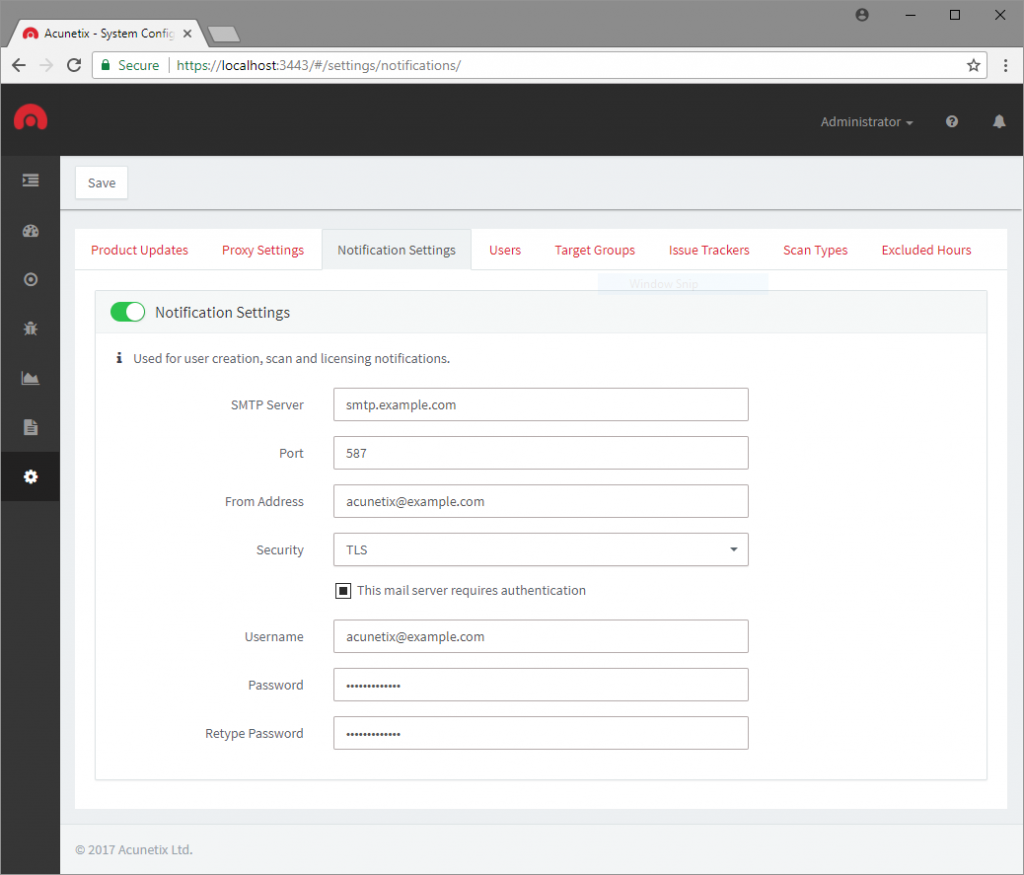
You may now enter the details of your SMTP server, configure any encryption and authentication if required.
Acunetix supports SMTP over both TLS and SSL, however, if you are unsure which protocol your SMTP server accepts, you may select ‘Auto’
for Acunetix to automatically figure out which protocol to use. Click Save to save and apply your settings.
Note – Some email providers such as Google G Suite and Microsoft Office 365 may require app-specific passwords when 2FA is enabled.
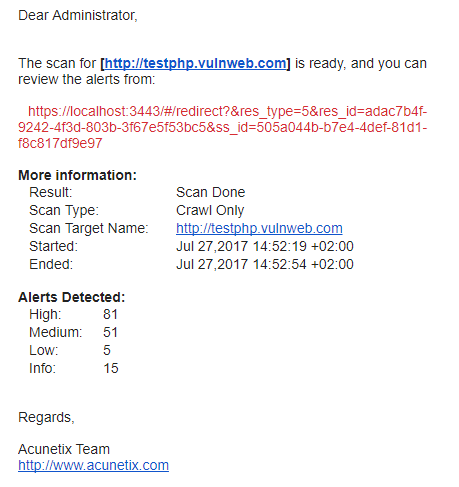
Acunetix will now forward all user creation, scan and licensing notifications to the configured SMTP server.
This will be addressed to the user who started the scan (in the event of a scan notification), or the administrator (in the event of an administrative notification).
- 首頁
- Acunetix 專區
- 常見問題
常見問題
- 日期:2021-02-01
- 分類:Acunetix 專區
常見問題